Crochet Panda Amigurumi in 5 Easy Steps: Free Beginner Pattern
- In this pattern:
- Materials
- Crochet panda amigurumi: 5 easy steps
- Assembling your panda
- Panda FAQs
- What to make next
- Displaying your panda
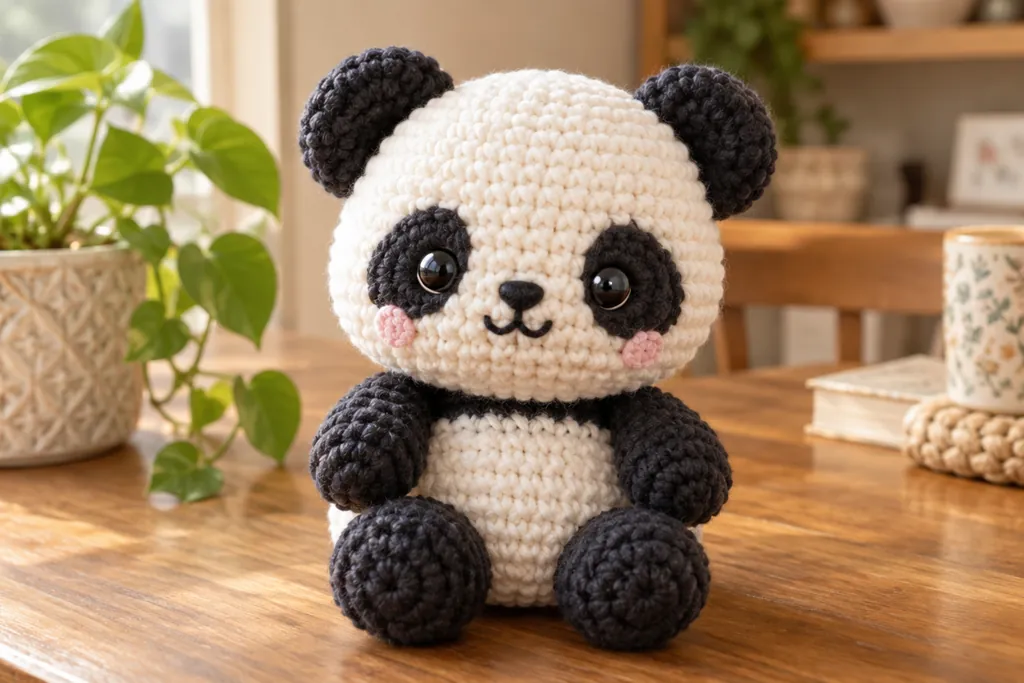
This little crochet panda amigurumi is the perfect first amigurumi. It is worked in simple rounds of single crochet, so there is no shaping to fear, and the black-and-white colour scheme hides minor imperfections beautifully. Follow this free crochet panda amigurumi pattern step by step and you will hold a finished panda today.
Never made a toy before? Read our amigurumi for beginners guide first for the magic ring and invisible decrease. You should also know the basic crochet stitches used in every toy. Once this crochet panda amigurumi is done, the whole animal kingdom opens up.
Materials for your crochet panda amigurumi
You need black and white worsted weight yarn, a 3.5 mm hook, safety eyes (9 mm), toy stuffing and a tapestry needle. A smaller hook than the yarn band suggests keeps stitches tight so stuffing never shows through. That tight fabric is the single most important secret of a neat finished toy.
Safety eyes must be fixed before you close the head, so keep them within reach from the start. If the toy is for a baby, embroider the eyes with black yarn instead. Check the Craft Yarn Council standards if your yarn band uses unfamiliar weight names.
Stick to plain black and white for your first panda. Fancy fur-effect yarns hide the stitch definition you need to see while learning, and dark colours make counting rounds harder under indoor light. Once the construction clicks, remake the same crochet panda amigurumi pattern in grey or brown for instant new animals.
Crochet panda amigurumi in 5 easy steps
Every panda breaks down into the same five steps: head, body, ears, eye patches and assembly. Work in continuous rounds with a stitch marker, and count carefully. Here is the full path.
Step 1 — Head. With white, magic ring 6, increase to 12, 18, 24, 30 over five rounds, then work 4 rounds even. Decrease back down, stuffing firmly halfway. A round head needs firm, even stuffing, so add small handfuls and shape as you go.
Step 2 — Body. With white, work a smaller ball the same way: ring 6 up to 24, two rounds even, then decrease and stuff. The body of your crochet panda amigurumi should be slightly egg-shaped, wider at the base so it sits without rolling.
Step 3 — Ears. With black, make two small circles: ring 6, increase to 12, one round even, fasten off with a long tail for sewing. Flat circles cup naturally into ears when sewn to the head. Keep both ears the same size by counting every round.
Step 4 — Eye patches. With black, crochet two small ovals: chain 5, work around both sides with increases at the ends. These patches give the panda its iconic look, so pin them in place and check symmetry in a mirror before sewing. Attach safety eyes through patch and head together.
Step 5 — Arms, legs and tail. With black, make four tiny capsules (ring 6 to 12, two rounds even, decrease, lightly stuff) and one small white tail ball. Sew limbs slightly forward so the panda sits upright. Weave in every end securely since toys get squeezed.
Assembling your crochet panda amigurumi
Pin everything before sewing a single stitch. Head on body, ears at ten and two o’clock, patches angled slightly inward, limbs even. Step back and look from every side. Adjusting pinned pieces takes seconds; re-sewing takes much longer and leaves marks.
Sew with matching yarn and small, tight whipstitches hidden in stitch valleys. Go around each join twice for strength. When your panda is assembled, give it a gentle roll between your palms to even out the stuffing, then fluff the surface with a soft brush.
Crochet panda amigurumi FAQs
How long does this panda take?
About 3 to 4 hours for a first attempt, under 2 hours once you have made one. Work it in two sittings: pieces one evening, assembly the next. Rushing the sewing is the main reason first pandas look lopsided.
Why can I see stuffing through my stitches?
Your hook is too big or your tension too loose. Drop half a millimetre in hook size and pull each stitch snug. Dark stuffing inside dark yarn and white inside white also hides a multitude of sins in any amigurumi toy.
Can I sell pandas made from this pattern?
Yes, finished toys made from free patterns are generally fine to sell in small batches. Credit the designer when asked, and never redistribute the written pattern itself as your own work.
What to make after this crochet panda amigurumi
Try the same construction in brown for a teddy bear, or grey for a koala. The head-body-ears formula repeats across hundreds of toys. Our 8 free animal patterns for beginners are ordered to build exactly these skills, so work through them next.
Displaying and gifting your panda
A finished panda deserves a good spot. Perch small toys on bookshelves, desks or nursery mobiles where they catch the eye. For gifts, tuck the panda into a small box with tissue paper and add a handwritten tag with its name. Handmade toys carry stories, so tell the recipient which yarn you used and how long it took.
Photograph your work in soft daylight near a window for the truest colours. Makers who share their pandas inspire the next beginner, so consider posting yours and linking back to this free pattern for others to follow.
Finish your crochet panda amigurumi this weekend and gift it to someone who needs a smile. Small black-and-white bears have ended more bad days than almost any other toy.